Planar Speaker Asylum

Welcome! Need support, you got it. Or share your ideas and experiences.

Return to Planar Speaker Asylum


Message Sort: Post Order or Asylum Reverse Threaded

Maggie 1.6QR Crossovers & Chokes for Dummies

96.242.179.127

Posted on October 18, 2009 at 11:16:51
palewin
Audiophile

Posts: 134
Location: New Jersey
Joined: December 13, 2008
This is a follow-up to a thread I started over in the Amps forum, and responses from Dawnrazor and others. I believe I qualify well for the thread title "for Dummies:" I have a fairly new (6 months old) pair of 1.6s, single-amped, not even biwired, and haven't soldered anything since High School shop class, a long time ago. I've been reading too many threads on both crossovers and chokes, to the point that I'm simply confused. I'm willing to relearn soldering, would prefer to not have to cut holes in my Maggie socks (as in one xo reference Dawnrazor gave me), since to repeat, I'm a beginner at this, and don't want to do anything that if I mess it up, makes my Maggies useless. Can anyone either provide info, or cross-reference to a prior thread, which
(1) Tells me if there is anything I can do with chokes for my straight stock non-bi-wired, non-bi-amped speakers (i.e. pictures or very clear description of where the chokes go);
(2) Similarly, a recommended cross-over with schematic and if possible pictures, including how it gets wired into the speakers? As far as cross-over, I would be happy if there were a good kit available, or (heresy) Maggie cross-overs one can buy for a reasonable amount? I've read that Peter Gunn will provide cross-over schematics, but I don't know if they are appropriate for a beginner like me.
Thanks in advance for your help and understanding!
- Pete


Hide full thread outline!
    ...
RE: Maggie 1.6QR Crossovers & Chokes for Dummies, posted on October 18, 2009 at 11:44:58
esande
Audiophile

Posts: 1663
Location: Washington, DC
Joined: December 27, 2008
My advice (for what it's worth) is don't try to fix what's not broken. Your Maggies are still under warranty, so I think that while gunning them is an option, it may not be a timely choice. Later on might be better.

By all means try the chokes. It is a very inexpensive and non-invasive mod that you may like.

The crossovers are fine as they are, they aren't broken.

Mye stands would be the most cost effective improvement at this stage.

I am right where you are with my 1.6s, and I'm a happy camper.


If you're talking about the tweeter chokes,, posted on October 18, 2009 at 13:46:37
Cory M.
Audiophile

Posts: 1172
Location: Midwest
Joined: April 10, 2005
It couldn't be simpler. Just place them in the tweeter attenuation port, instead of the steel jumper, and tighten the set screws back down. No soldering required. You can use these alone, or in combination with the Magnepan- supplied resistors, depending on preference.

I have an extra pair of these (J.W. Miller 5522s) if interested, just send me a message and I'll send them out to you.

As far as crossover mods go, there really isn't any way to go about it besides undoing the socks at the bottom and "peeling" them up a little, or cutting a slit to do the work. Most of the parts, being larger than factory items (besides some capacitors,) won't fit back in the speaker in the stock configuration.


Cory


RE: Maggie 1.6QR Crossovers & Chokes for Dummies, posted on October 18, 2009 at 15:22:49
play-mate
Audiophile

Posts: 948
Joined: November 21, 2008
both cory and esande are right !

stands are real improvements, and the chokes will upgrade the treble performance of your MG1.6´s also.
-that´s pretty much you can do without voiding your warranty.

the implementation of a new crossover a la peter gunn, or even just the stock crossover with high quality components, is definitely a serious quality gain, but will require "socks off" and is a rather drastic modification.
- a dramatic gain in sound quality nevertheless !!

one is easier inclined to do such a "tweak" on less new speakers, obviously.

if you´re not quite happy with the performance of your MG1.6´s, do remember that all maggies benefit from being feed by the very best in amplification..... -don´t be wimpish on that front !!

kind regards


Hysolid // Mytek Brooklyn // Spectron Musician III // Analysis Audio Omega


RE: Maggie 1.6QR Crossovers & Chokes for Dummies, posted on October 18, 2009 at 22:12:51
Dawnrazor
Audiophile

Posts: 12592
Location: N. California
Joined: April 9, 2004
Hey Pale,

Cory covered #1.

#2. There is a much better crossover link that has step by step with lots of picts in the archive- the one by Ed Hsu. I would have linked that, but the link doesnt work. maybe you could contact Ed using the e-mail address in the link (or if that doesnt work, I think he is the HSU from the Hsu sub company but could be wrong) or ask Mart who moderates this asylum if he has a back up or the correct link.

And you can always get replacement cloths for the mags. They were $75 for the mmgs when I bought mine. You could remove the staples and reuse the ones you have or just cut it and if you want to resell just order new ones and then mess with the staples.

And here is a link to the tweaks page. There are a few for the 1.6 so you could look at all of the ones listed, not just the one link I gave. Scroll down to you get to the 1.6 tweaks. Pturn has some picts of one that fits in the size of the original so you dont need extra boxes if you dont want that.

tweaks

And there was a poster here who had Parts Connexion I believe do all the hard work and just installed the crossovers they made for him. I bet Madisound would do the same thing.

partsconnexion crossover

Though if you could solder at one point, you can probably do a crossover. In fact I can solder but except for one joint, I didnt need to solder at all on mine.

d

Cut to razor sounding violins


RE: If you're talking about the tweeter chokes,, posted on October 19, 2009 at 16:52:09
palewin
Audiophile

Posts: 134
Location: New Jersey
Joined: December 13, 2008
Corey: First, thanks for the offer of the chokes. From what I can find, it sounds as if the J.W. Miller 5502s work better for most people than the 5522s, so I'm going to order those direct from Mouser. But again, thanks for your offer, I don't mean to sound ungrateful. Now, just to make sure I have this crystal clear: each Maggie 1.6 has three pairs of female connectors. The first pair (pos. & neg.) are for a single amp speaker wire, which I'm using. The other two pairs, marked "biamp" are connected with the steel jumpers. So I replace the two jumpers on each speaker with a pair of chokes, using 4 chokes in total, 2 on each speaker. Do I have it correct? Thanks again.
- Pete


RE: If you're talking about the tweeter chokes,, posted on October 19, 2009 at 17:18:39
Dawnrazor
Audiophile

Posts: 12592
Location: N. California
Joined: April 9, 2004

Hey P,

I think they go in the top left most place, where one normally would put the resistor.

I could be wrong since I haven't run stock in a long while, but I think this is right.

Cut to razor sounding violins


RE: If you're talking about the tweeter chokes,, posted on October 19, 2009 at 19:53:00
palewin
Audiophile

Posts: 134
Location: New Jersey
Joined: December 13, 2008
One more attempt to make this clear to me: I'm not sure what the "tweeter attenuation port" is, and I'm pretty sure it can't be the "top left most place." In Dawnrazor's photo, the top pair of connectors (they look sort of silvery in the picture) are where my speaker cable goes. In the stock 1.6s, a pair of steel jumpers go vertically between the "Low" and "High" connectors (the four brass colored ones in the photo), where Magnepan has the word "jumpers" stencilled on the plate. Magnepan's instructions for using resistors to attenuate the highs says to replace the left-most jumper on each speaker with the resistor (so it would run vertically between the left-most "Low" and "High" connectors in the picture). So if the chokes go where the resistor would go, it means on each speaker I replace the left jumper with a choke, one end of the choke screwed into the "High" connection, the other end screwed into the "Low" connection. One choke per speaker and one jumper per speaker. Is that it? I really apologize for dumming this down to this level of detail, but it truly is "electronics for dummies!" (I promise to try and get smarter in the future...)
- Pete


Its not you its me :), posted on October 19, 2009 at 20:06:41
Dawnrazor
Audiophile

Posts: 12592
Location: N. California
Joined: April 9, 2004
Pale,

I was wrong. It has been soooo long since I used the stock connections.

What you say is right as far as I can tell. Just put the choke on the left side where the resistor should go.

Sorry for the confusion.


Cut to razor sounding violins


Sticking my nose in here, posted on October 19, 2009 at 21:21:27
Keith944T
Audiophile

Posts: 233
Location: Western PA
Joined: April 23, 2009
I think some of the confusion here is that there is NOT a tweeter attenuator connection labeleled as such on 1.6's. (At least there isn't on mine)
There is one on my MMG's and the 3.6's, but not the 1.6's.

However, I think you can (OTHERS please feel free to correct me if I'm wrong)probably stick a choke in the two connectors marked for the "high side" on the Bi-wire/Biamp inputs, (yes, take the bridge out and replace it with a choke or resistor, I've had better results myself with the ceramic 1 ohm resistor) and leave your connection the way it is into the top two ports.(conventional wiring) Keep the low side bridged the way it is.


RE: Sticking my nose in here, posted on October 20, 2009 at 05:37:06
palewin
Audiophile

Posts: 134
Location: New Jersey
Joined: December 13, 2008
OMG - my IQ has dropped by at least 100 points, since I feel like I'm the only one in the world who doesn't get this. I was fine with Dawnrazor's reply (confirming that I replace a jumper with the choke) but Keith's reply sets me back. On the stock 1.6s, the steel jumpers (nothing in the Magnepan documentation is called a bridge) run vertically, connecting the "low" and "high" biamp ports, one for the positive pair and one for the negative pair. If Keith is correct, that the choke goes between the "high side", that would mean you LEAVE BOTH JUMPERS IN PLACE, and add a choke going HORIZONTALLY (look at Dawnrazor's photo) between the two biamp ports marked "high." That's a completely different layout from replacing a jumper with the choke. Brain surgery anyone?
- Pete


RE: Sticking my nose in here, posted on October 20, 2009 at 08:02:11
Dawnrazor
Audiophile

Posts: 12592
Location: N. California
Joined: April 9, 2004

I think you had it right the first time.

Just put the choke where magnepan says to put any supplied resistors.

From what I can see that looks like a vertical connection.

Also the schematic seems to back that up. You want the choke on the "+" jumper in the diagram. Which as I see it would go from Low to High not High to High....


Cut to razor sounding violins


Sorry I misnamed a jumper as a bridge, posted on October 20, 2009 at 09:02:59
Keith944T
Audiophile

Posts: 233
Location: Western PA
Joined: April 23, 2009


I'm always complaining about needing a dictionary to keep track of terms we use here on the forum and I made up my own... a very bad move.

So was not looking at my 1.6 Instuction manual before posting above.
Sorry, I've been more stupid than usual this week.
Anyway, here's a photo of the manual showing how to tweeter attentuate....


RE: Maggie 1.6QR Crossovers & Chokes for Dummies, posted on October 20, 2009 at 09:59:16
Leon


I see the DCR of the choke is 0.4 ohms.
What happens if I replace this with less or more resistance?
I can buy or construct (per formula / online calculator) several
variations, some with higher / some with lower than 'stock' resistance.


RE: Sorry I misnamed a jumper as a bridge, posted on October 20, 2009 at 15:02:24
esande
Audiophile

Posts: 1663
Location: Washington, DC
Joined: December 27, 2008
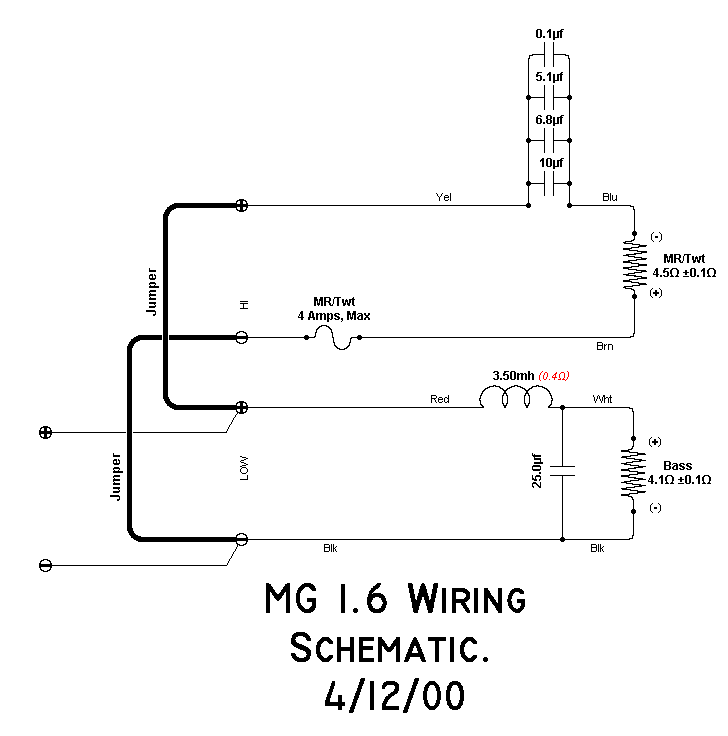
You do it...


...like this.


What choke? The JW Miller chokes are 17 and 6 milliohms., posted on October 20, 2009 at 15:50:37
Al Sekela
Audiophile

Posts: 9169
Location: Northern California
Joined: February 18, 2002
See the pdf file at the link for the list of JW Miller 5500-series choke specifications.

The 5502 is 0.017 ohms, while the 5522 is 0.006 ohms.

You can add resistance if you want, but the point of the choke tweak is to deliver acceptable treble smoothness without significant audio-band attenuation.


More or less ohms?, posted on October 20, 2009 at 15:51:47
esande
Audiophile

Posts: 1663
Location: Washington, DC
Joined: December 27, 2008
You'll attenuate the tweeter more or less. The supplied attenuation resistors for my 1.6s were 1.2 ohms. I ran the speakers with them in at first but after about 100 hours of break in I pulled them off and replaced with straight jumpers. The chokes by themselves probably have some effect on tweeter level but it's not particularly noticeable (at least to me).


RE: What choke? The JW Miller chokes are 17 and 6 milliohms., posted on October 20, 2009 at 16:53:35
Leon


my bad.
The aircore INDUCTOR has a DCR of 0.4 ohms.
higher or lower has what effect on lo frequencies?


THANKS!!, posted on October 20, 2009 at 20:49:54
Dawnrazor
Audiophile

Posts: 12592
Location: N. California
Joined: April 9, 2004
A pict is worth a thousand words!!!

Cut to razor sounding violins


Lower resistance delivers more power to the bass panel., posted on October 21, 2009 at 15:53:02
Al Sekela
Audiophile

Posts: 9169
Location: Northern California
Joined: February 18, 2002
There won't be much practical difference unless you use an inductor with much higher resistance.


RE: minimal soldering needed, posted on October 21, 2009 at 23:28:41
Canoe
Audiophile

Posts: 28
Location: Ottawa
Joined: November 29, 2007
The 1.6s may be under warranty, but if you've got a decent amp/pre/source, then upgrading a la Gunn XO with a particular DIY speaker cable will get you a speaker that will contest, and on an ice amp, outperform 3.6s on bel Canto electronics. Detail, clarity, transparency, smoothness and musicality just blows the 3.6s out of the water.

A crossover a la Peter Gunn is one of the easiest "electronic" projects you can do. There are minimal components and electrical connections. Mechanical layout is simple. Use the recommended brand/components - no substitution. Both mechanical isolation and electrical isolation can be achieved with foamed Teflon cord (a la plumbing tap cord - used for DIY interconnects at Cable Asylum). Cable ties isolated with Teflon tape hold the caps in place. The foamed Teflon cord goes between the components and the mounting board.

Soldering for audio circuits is not just a matter of mechanical joining (this isn't a copper roof or household plumbing), it must be a quality electrical joining. There is a lot on correct soldering for quality electrical joins over at the Cable Asylum.

However, many of the connections can be replaced by a crimp joint. WBT crimp sleeves (gold plated copper) are an easy, reliable and high quality signal path way of joining (see crimping at Cable Asylum). This eliminates solder joints that may be done less than idea and degrade the audio signal path.

Over bare wire/leads, use Teflon heat-shrink against any leads before you put any colour-coding heat shrink on top.

The leads to the speakers should be soldered to the tabs on the panel (crimping is not an option here) - practice soldering first. The connectors for the speaker cables from the amp have soldered connections inside the XO box too. With care with the inductor leads, everything else should be easily crimp-able with sleeves.

If you make the leads to the panel short, say four inches, then have the three outputs of the XO leave the XO box by wire and not use connectors, then you can crimp join the XO wire and panel tab wires. This eliminates three speaker connectors (cost and possibly not ideal solder connections), but you move the speakers to a new house/etc., you have to cut the crimp sleeve out and reconnect with new sleeves at the new location.

Peter Gunn will supply the schematic upon email request. However, note that Peter Gunn will make you a complete turn-key XO box, available in many gorgeous woods, even including the wire for connecting the XO to the panel, for awfully close to the cost of sourcing the materials used to make the XOs.

The DIY speaker cable is not cheap, but it is very cheap for a quality speaker cable. Check Cable Asylum for twisted-pair cross-wired Belden 89259 a la "Jon Risch". Again, the cross-wired connections can be made with WBT crimp sleeves, and the spades should be crimped as well. Teflon heat-shrink on top of the copper wire please. Anywhere from $150 to $200 depending on termination hardware used and source of that specific Belden cable. The Gunn XO and ICE AVR brought the 1.6s in direct competition with the 3.6s, with the edge with detail and musicality to the 1.6s. Adding these DIY speaker cables and the end result is so far superior to the 3.6s it is astounding. We haven't heard the dealer's 3.6/bel-Canto setup with these DIY cables, but the dealer has his carefully selected high-end cables in place. Both myself and my friend were assuming that down the road we'd be upgrading to 3.6s - not anymore.

The synergy between Gunned 1.6s, Belden 89259 cross-wired speaker cables and an Ice amp AVR is astounding! The "Ice" amp tested is a Pioneer AVR SC-07. Yup. This combination is the best quality sound I've ever heard, and of course blew the dealer's 3.6s on bel Canto amplification out of the water.


RE: Lower resistance delivers more power to the bass panel., posted on October 23, 2009 at 14:56:08
Leon


So, you'd figure as long as i was 'within reason', I'd have no bass end boost from going lower on the Inductor DCR?
I'd like to go to 14ga or better and build an external x-over.

Should this new inductor be magnetically shielded from everything else?


Yes, This is great...But, posted on October 23, 2009 at 15:10:43
Keith944T
Audiophile

Posts: 233
Location: Western PA
Joined: April 23, 2009
How might I do this if I'm bi-wired?
Just shove the choke wires in there with the banana plugs?


Well, I think..., posted on October 23, 2009 at 15:56:58
esande
Audiophile

Posts: 1663
Location: Washington, DC
Joined: December 27, 2008
...you would put them in series with the high frequency "hot" side speaker cable. Since biwiring amounts electrically to lengthening the jumpers, that would be the way to go.

I'm curious as to what benefits you expect from biwiring?


RE: Well, I think..., posted on October 23, 2009 at 20:01:54
Keith944T
Audiophile

Posts: 233
Location: Western PA
Joined: April 23, 2009
I don't think I agree with your assesment that bi-wiring is just lengthing the jumpers, there is signal coming through, they aren't just connecting the 2 sides.

Well anyway, I think the theory of Bi-wiring is similar to Bi-amping, except, there's obviously not more power.
But the signal is fed directly to the low side or the high side.
I hear a "bigger" sound. not louder, but more body, depth? maybe.
but, even though I didn't think it would make a difference, it does to me, and I like it better.


RE: Well, I think..., posted on October 23, 2009 at 21:03:23
esande
Audiophile

Posts: 1663
Location: Washington, DC
Joined: December 27, 2008
Biamping is not biwiring. The only reason I can think of to biwire is that you may believe (and it could be true) that biwiring with different cables for the mid/high vs the bass may have some signal pass utility.

I believe that that is what the crossover is there for. Biamping with an external crossover or a line level crossover is a different kettle of fish.

In the latter case, you do have the benefit of optimizing the amps for the intended frequencies. But on the 1.6s you can't do that without surgery.

Look, the 1.6s aren't structured for biamping. Biwiring is possible but my question is why do it?

Look at the schematic that was posted here.


yeah, I know that..., posted on October 24, 2009 at 05:07:38
Keith944T
Audiophile

Posts: 233
Location: Western PA
Joined: April 23, 2009
I said the theory was similar.
And I didn't say I was Bi-amping the 1.6's, I said they were Bi-wired.
I read a primer on Bi-amping a while ago, I thought it was on this site, but I just looked at the one here in the asylum, and it is not the one I read.
The one I had read did explain the similarities of purpose in bi-wiring and bi-amping.
As I've stated before, I can't read a schematic.

And as I also said, I do hear a difference with them Bi-wired vs. single wired.

Maybe you're right, and it doesn't do anything, and I'm only benefiting from the placebo effect, but it works for me.
I think the Maggie folks think there could be an advantage too, why else would the set them up to be bi-wired and not Bi-amped? Maybe that's just marketing.


RE: yeah, I know that..., posted on October 24, 2009 at 06:05:31
esande
Audiophile

Posts: 1663
Location: Washington, DC
Joined: December 27, 2008
Well. I take your points. As to why they (the Magnepan people) set up the 1.6 the way they did, I can't say. I can say that the manual says you can do it. That's it. It does not speak to technique, which is odd as it DOES speak to technique as far as placement and break in.

I'm inclined to believe that the biwire capability is incidental to the high/mid attenuation, which for a fact is desirable in new 1.6s. I will not speculate as to why they threw the reference in.

The manual says nothing about chokes either, but a solid case can be made for their use.

In sum, they are actually REALLY good speakers at the price point. Cheap in construction, yes. But they sound so good for what they cost.

Enjoy the music.


No. The shielding material may affect performance., posted on October 24, 2009 at 14:38:18
Al Sekela
Audiophile

Posts: 9169
Location: Northern California
Joined: February 18, 2002
The better approach is to place the inductors perpendicular to each other so that mutual magnetic coupling is minimized.

Magnetic shielding materials are highly nonlinear and may induce distortion if placed where significant magnetic energy from the signal gets to them.


Page processed in 0.037 seconds.